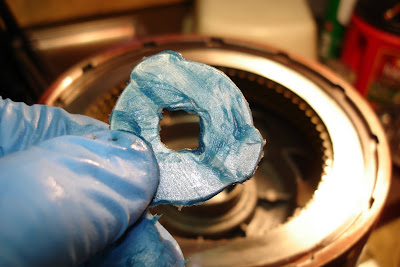
First off. There's a fiber thrust washer that goes between the rear and forward clutches. The spec on this washer is .061-.063". I replaced mine since it came with the kit. The old one is the white one on the left. The new one was black.

Now install the rear seal ring on the input shaft. It's the larger seal here. The old one was a steel snap-end type. The new one was a teflon type with tapered ends. Also install the 2 front seal rings. They are also the teflon type. Assembly lube in the grooves and on the rings helps them to stay put.

Now install the fiber thrust washer in its groove on the rear clutch splined hub. A little fresh ATF here is good.

Take the front clutch assembly and smear some assembly lube on the bushing and sealing surface in its center.

Now take the front clutch assembly and slide it down over the input shaft. All those clutch pack teeth you just lined up will (hopefully) engage with the splines on the rear clutch hub. Work at it a bit. A little twist here and there helps. If you don't get it at first, maybe take the front clutch assembly back off and re-align the components then try again. Or maybe you'll get lucky and it will just slide right on! That didn't happen for me!

When you get the front clutch nested down nicely on the rear clutch it should look something like this.

Turn the clutch assembly over and set it somewhere so that it can rest on its own. I used the opened jaws of my vise.

Now, in the end of the input shaft, the eye that's looking up at you from the center of the rear clutch, is where the intermediate shaft thrust washer goes.

My rebuild kit came with several thicknesses. I chose the thickness that most closely matched the one I took out. You can see my original on the bottom left with the wear marks.

Apply some assembly lube to the washer so that it stays in it's spot when you install the clutch assembly into the main case.

The thrust washer fits into the end of the input shaft only one way because of the arrangement of the three ears. Make sure the groove is facing up, or to the rear of the transmission.

Now center and align the teeth of the friction components of the rear clutch. They nest down over the outside of the front annulus gear that's inside the driving shell already installed into the main case.

Here are two photos of the rear clutch installed into the driving shell WITHOUT front clutch. This is just to sort of give you an idea of how it fits in.


Now install the clutch assembly with the input shaft into the main case. Now that I'm done with this project, I can, without a doubt, say that this was the ABSOLUTE MOST frustrating part of this whole job. Grrr! The Factory Service Manual said to place the case in an upright position. I tried that. It worked about as well as standing on my head. Trying to do it with the case horizontally worked about as well as trying to breath underwater! All the friction pieces tend to get misaligned, and then you have to pull the pieces apart, re-align it all, then try again. All the while getting more and more ATF all about your person. So, patience, I guess. Just make sure, in the end, that the thrust washer that you just installed on the end of the input shaft stays. It tended to "migrate" to other parts of the transmission with little bumps.
Now, I hesitate to mention this part, but once you get this all assembled, you're likely to have to pull it apart again! After you install the pump and housing in the front of the case, you have to take a measurement for input shaft end play. If it's wrong (and mine was) you'll need to replace the thrust washer with a different thickness. Glory be! I'll detail that procedure a little later.
Here's a pic of the clutch assembly finally installed into the main case. You can see here how the teeth on the front clutch retainer mesh into the slots on the driving shell of the intermediate shaft/planetary assembly...but not quite! So I don't have the last friction engaged with the splines correctly! Grrrr!

And here's a more general photo of all the pieces in the main case. I have the case in the "vertical position" the FSM so gloriously refers to her. Here the front clutch retainer and driving shell are interfacing much more appropriately.

Next: Installing the front band.