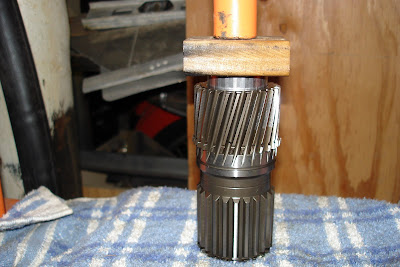
I start by putting some assembly lube on the pilot bushing (the small one) and the clutch hub bushing (the large one). I didn't install new bushings as my kit didn't come with these, and these looked just fine. These are in the forward end of the output shaft.

Here's a shot of the major components I'll use next. The output shaft is in the middle. The annulus gear is on the left. And the clutch drum is on the right.

Slide the output shaft into the annulus gear. It interfaces only one way. Then install the associated snap ring. Here, you'll see the snap ring partly installed.

Now, slide the forward output shaft bearing (it's the larger of the two) onto the output shaft. Make sure the indexing groove is up, or towards the REAR.

Install the associated snap ring.

Here's the snap ring in place.

Now I'm ready to install the clutch drum over the annulus gear. Here you see the two snap ring grooves at the rear (top in this photo) of the clutch drum. One goes to the rear of the tangs on the annulus gear. The other goes forward of the tangs. It's a little tricky to assemble, but not that hard once you get the hang of how it goes together.

Slide the clutch drum over the annulus gear and install the snap ring (it's a wire type) into the rearward groove in the drum. Note: when I disassembled these I marked the annulus gear and the clutch drum so that I could index them the same when I reassembled the unit. I of course forgot about this only to remember a few steps into the process. I had to disassemble the whole unit, index the 2 parts, then put the whole mess back together. So...make sure you index them correctly to start with. I don't know how much it matters. Maybe it's balanced as an assembly. But it can't hurt to do it right.

Slide the drum all the way forward so that the snap ring you just installed contacts the tangs on the annulus gear then install the other snap ring in the forward groove in the drum.

Here's the assembled unit.

Now I'm ready to assemble the over-running clutch, some would call it a sprag, and the planetary gears. Here's the new over-running clutch and the clutch hub.

Install the over-running clutch on the clutch hub. It only goes on one way. Be gentle. The rollers have a tendency to pop out if you look at it wrong.

Put some assembly lube on the face that the thrust bearing contacts. This gives it some sticktion when assembling. Note the orientation of the thrust bearing. Make sure the inner shoulder points up.

Install the thrust bearing on the clutch hub.

Now I use the snap ring pliers to "grab" the splines inside the clutch hub. Install the clutch hub into the annulus gear with a counterclockwise turning motion. (Clockwise will bind.) Easy does it. Again, the rollers have a tendency to sproing all over the place.

The over-running clutch and clutch hub installed.

Now it's time to drop in the planetary gear assembly. I spread a little lube on the gear teeth inside the annulus gear.

The planetary gear goes in this way.

The planetary gear installed inside the annulus gear. Note the planetary gear teeth are even with the annulus gear teeth. This indicates all the pieces are assembled correctly.

Now I'm ready to reassemble and install the sun gear assembly. First I press the bushings into the sun gear. I actually didn't need to do this since my kit didn't come with new bushings and my old ones looked just fine. So here, I'm "reinstalling" the sun gear bushings.


Now install the spring plate. This is the plate the giant spring pushes against. I got a new "updated" spring plate. It's supposed to have the correct angle machined so that when the spring loads against it, it won't deform. The old one is on the left, the new on is one the right. Not much difference visually.

Drop the spring plate onto the sun gear.

Install the associated snap ring that holds the spring plate on.

Apply some assembly lube to the spring plate for that sticktion factor in order to hold the planetary thrust bearing. Again, note the orientation of the thrust bearing. The inside shoulder should point up.

Install the planetary thrust bearing onto the spring plate. And smear a little assembly lube onto the sun gear teeth.

The sun gear goes down into the planetary gear like this.

Nest the sun gear down into the planetary gear until it bottoms. It should look like this.

Next: rebuilding the overdrive direct clutch, aka, that "monster" spring.
2 comments:
You installed your overdrive sprag (overrunning clutch) upside down.
Annonymous,
Where were you a long time ago? I pulled my hair for 2 years trying to figure out why I had an RPM flair on the shift between 3rd and OD. This would explain it! Thanks.
Meanwhile, I had a some parts failures in the front clutch. I didn't have the time to fix it so I took it to a shop and had a towing transmission built. The result is excellent.
Post a Comment